 CURRENT MOOD: Relaxing, after a long night of pumpkin carving.
 STEP 1.) CARVING TOOLS
Begin by picking a pumpkin that will fit the pattern you want to carve. You will need a carving kit or at least a set of tools to get the job done. You can buy them at the store fairly inexpensively or use things around your house. Some things that will double as great pumpkin carving tools are steak knives, metal spoons, and push pins.
 STEP 2.) PATTERNS
There
are tons of options for pumpkin patterns; you can find them online, in
books, in carving kits, or you can even free hand them! After choosing
the perfect pumpkin pattern, use push pins to secure it; just
make sure the pattern sits flat on the pumpkin. Then using a push pin poke holes
along the lines of the pattern. Remove the pattern and put it aside for
reference.
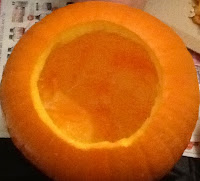 STEP 3.) GUTTING
Start by creating a lid in the top of the pumpkin with a knife making sure to cut at an
angle so your lid won't fall inside. Remove the pumpkin
seeds and strings with your hands. (Save them for snacks, planting, or toss them out!) Then use a scoop tool or metal spoon to scrape the walls down and clean up the interior of the pumpkin. Give it a good rinse out and begin carving!
STEP 4.) CARVING
Using a carving saw tool or knife, push it straight into the pumpkin along one of the lines you transferred, begin sawing in a straight in and out motion following your lines.
When you are done carving, poke the pieces out gently, if you did not keep a perfect straight line you may have to poke some pieces out from the inside. Most pumpkin patterns show the areas to be removed in gray, make sure you follow the pattern to get the best results.
 STEP 5.) COMPLETION
Once you are done carving your pumpkin give it a rinse, this will help to give it moisture as well as clean out any extra bits that you may have missed. Store your pumpkin in a cool place to aid in preservation and to keep it from drying out and shriveling up. Illuminating your pumpkin can be done several ways some examples are candles, lighters, corded lights, and battery powered LED candles.
Personally I prefer using the battery powered LED candles as they do not tend to dry out the pumpkin as quickly, will not burn or blow out, and are much safer than the other options.
You can use toothpicks to stick pieces back onto the pumpkin in case they had fallen off when you were removing the excess. I had to to do this in my example but I bet you cannot tell which piece it is!

 STEP 1.) CARVING TOOLS
  STEP 2.) PATTERNS
  STEP 3.) GUTTING
 STEP 5.) COMPLETION
No comments:
Post a Comment